Drawing Help, Tips, Tools & Mechanical Aids……….
This page will change, be corrected, added to and just generally evolve as further stuff  occurs to me. In the meantime accept this as just a willing start. Feel free to email me on the email address at the bottom of the page to add,comment or correct…… all constructive criticism is welcome. Artists and tutors may well be offended….. this is written for those folk who, like me, are challenged by so much in art. As I often remind beginners at painting (and others) …. if we’re not having fun then we’re doing it wrong….blow this “suffering for our art” lark.
Dave Hendry February 2012
Drawing is a discipline that is learned over a period of time and takes practice………possibly lots of it, but some people are only really interested, at least initially, in creating a painting. We all want instant success…….we make such demands of ourselves and the difficulties presented in creating a drawing that satisfies us can actually lead to a person just giving up on the entire art process.
That’d be such a pity……Never give up ….. perhaps you could try a few ideas, a strategy that would result in producing a drawing for you to paint and allow yourself to get more comfortable with the process of freehand drawing over a period of time.
These “strategies” will include all methods of creating drawings by the use of tools, aids, methodologies and, as I’m sure some purists might say; downright cheats!!
A good friend and tutor of my acquaintance almost fainted when I told her that I would be producing this page for the website……. so with apologies to that esteemed artist please continue.
As you might have guessed my thoughts on using nefarious methods to create pre-painting sketches are much more liberal than most. I take the view that if the attempts at producing a drawing would only result in a potential painting enthusiast giving up before they start, then it’d be foolish not to offer some shortcuts until such time that they feel more confident. I feel that good artists forget how difficult we (ie me) relatively untalented students find drawing. I’ve also seen what can happen when a number of people are given the same pre-drawn subject…… the resulting paintings are always radically different from each other. Twenty people all working from the same pre-drawn sketch will end up with markedly different paintings.
So……for those who just want to get on with painting and worry about the undoubted skill of drawing later…….. continue.
Tracing
Tracing Paper
Ah tracing……. what a guilty secret this can be. But how best to go about it?
If you have a photo that you don’t want to ruin (and for some reason you are unable to scan it) or some other subject that doesn’t lend itself to electronic imaging; then the following method might help.
Tracing paper is a semi-transparent, usually white paper which is quite thin. If it is placed over the subject eg photo or other item to be copied, you will be able to see the item through the paper. Carefully trace around the subject until the complete image is copied .
.
Then turn the tracing paper over and rub the areas that have lines on them using a soft pencil (HB or softer). Now place the tracing paper over your painting surface, secure it in position using masking tape, and re-trace around the subject, following the previously made lines, carefully. The image will now be transferred to your painting surface.
Tracedown (or similar)
Tracedown could probably best be described as being similar to carbon paper beloved of typist who needed to create copies of documents as they were typing. This was achieved by sandwiching carbon paper between two pieces of typing paper so that letters were copied through as it was typed (Carbon paper still echoes via the “Cc” and Bcc” that you see in you email account ie Carbon Copy and Blind Carbon Copy…… but I digress, which is entirely like me) Carbon paper may well have waxy coating so it wouldn’t be a good idea for watercolours whereas Tracedown and others do not have that problem.
So…….take your subject photo and place it on top of your intended painting surface and secure it along one edge, then slide the Tracedown between the photo and the painting surface ensuring that the coated surface is in contact with the painting surface. Tape everything down and then carefully trace around your subject photo. Carefully lift one edge of the Tracedown and photo to check that all the image has been transferred. It can be a good idea if you put pencil marks at each corner of the reference photo so that its position on the painting surface is recorded. In this way if you later discover that some areas of tracing have been missed then you can easily re-align the reference photo. Note also that Tracedown comes in a variety of colours so that you can use it to transfer images, for example, onto a dark painting surface by choosing a white sheet.
Well, …… it’s what to do if you find you have no tracing paper, Tracedown or other suitable means to quickly transfer the desired image. It’s cheap, quick and readily at hand. What you need to do is to turn your reference image over and rub soft pencil or charcoal on the back. Now……turn it back over and carefully place the image onto your painting surface and carefully trace around your image with a pen or other pointed item. The image will be transferred. More care needs to be taken as the pencil or charcoal will have a tendency to smudge and/or get on your clothing, plus it will be a little dusty. This is a very useful little trick if other methods aren’t available.
Grid
The general principle of using a grid is  elegant in its simplicity. Imagine the following scenario……. you have a reference image (it could be a picture from a travel brochure or magazine, or it could be a photo that you have taken or any image for that matter). For the sake of discussion lets imagine that the photo is 12″ x 9″. The photo shown here is one that I took when we visited Tresco in the Isles of Scilly and is of Cromwells Tower.
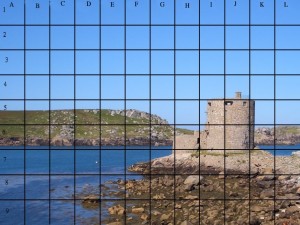 What you do is to draw lines on the image. I have shown the image with lines at a 1 inch pitch, both vertical and horizontal. I have also annotated the grid as A to L along the horizontal and 1 to 9 along the vertical.
And now the magic,……well, it’s not really 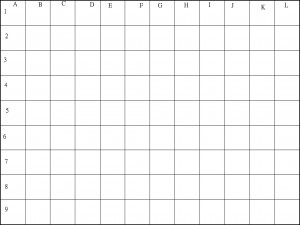 magic…..I’m just attempting to build up the tension…… it isn’t working is it? You now create a similar grid on the piece of paper (or other surface) that will have the image transferred to it. Now you’re ready to transfer the image over. For example the top left hand side of the tower lies in square I5 so we can put a dot into the relevant square in our blank paper. Repeat this process for more features of the squared source image then add them to our destination surface. Eventually sufficient points will have been added to our blank destination sheet to allow us to “join up the dots” and create the finished picture.
There are a few things to note about this process:-
1. Darkness of the lines -When creating the lines that form the grid make them as light as you can ie so that you can just see them. These lines will need to be erased on your eventual painting. This would be more important when painting a watercolour as that medium is meant to be translucent so anything beneath the paint will show up. It’s likely that it won’t be as important on pastels or acrylic as those media will cover any evidence of the drawing. In any event, as soon as you’re able you should erase the lines and other evidence of drawing using a “putty” rubber (ie an eraser that will remove pencil but will not scurf the painting surface)
2. Scale – The example of gridding shown here doesn’t mention scale….. or the options to re-scale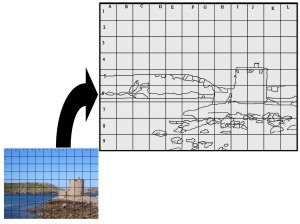 the reference image. It’s a very useful trick to know. Imagine that you have taken an image of an exotic place from a holiday brochure and it is only 8cm x 5cm and you’d like it to be bigger. Ok…… here’s the process. Having added a grid to your source image of say one centimetre square you then can add a square grid to you painting surface of, for example, 3cm square. The final painting will now be 24cm (ie 8cm x 3) by 15cm (ie 5cm x Transferring the image across works in exactly the same way ie the feature in square H5 from the source image will also be drawn in square H5 on (the 3 times larger) painting surface. Of course this process can be used to reduce a very large image down to a more modest size.
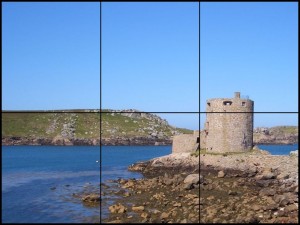
3. Grid size….. this is one of those things that seems obvious when someone mentions it but it should be considered before commencing creating a grid. Take my example above of Cromwell’s Tower, how big should the squares be? Well, it’s a judgment call….. if I had only half of the squares that I have shown then it would be more difficult to estimate whereabouts in that square a feature actually lay. It’s clear then that if I had only six squares in total (ie two lines vertical and one horizontal) then I’d have virtually the same drawing challenges that would have existed if I’d no squares at all.
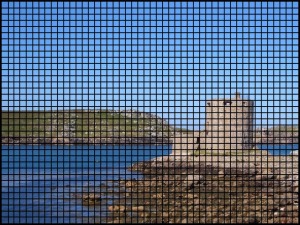
Conversely, if I’d put 4 times the number of squares that I have shown above then there would be an element of redundancy in the gridding ……. just too many squares. The pitch of your squares should suit the size of the image and not be so far apart that you’re still left with a puzzle regarding where you should draw a feature. Remember also that you don’t want to put too many as they all have to be erased.
4. Do you have to draw a grid? -It actually isn’t always necessary to draw a grid onto your reference image……as long as there is a grid of some kind to refer to. Well, that’s just gibberish isn’t it. How can you use a grid but not draw one on the reference image? It’s simple…… you can acquire a piece of transparent film with a grid drawn on it and place it over your reference image. Once you’ve secured it in place with tape or bulldog clips etc, you can proceed just as you would had you drawn the grid onto the reference image.
Tools
There are a number of tools that can be used while drawing, such as protractors, rulers. compasses etc (did you hear that “thud”?…… that’s the sound of proper artists falling off their chairs with apoplexy……Tools!?…aaargh) Well, yes……tools. Even primates, some birds and the veined octopus; have been shown to have the good sense to stop struggling and find a tool.
Homemade Protractor
This is a little aid to copy angles from the 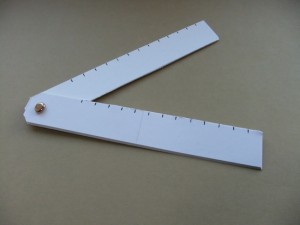 reference picture to your drawing. Thanks for this should go to Debbie Butterworth, a tutor of the group, who showed us how to make one and how to use it. Take 2 pieces of stiff card approx 25mm x 125mm or 1″ x 5″ (I have cut some from some scrap mount board) Carefully pierce a hole in one end through both strips and insert a split paper clip to hold the pieces together. The strip could have a scale drawn on them (mine shows a scale of 1 cm marks) Any scale may, of course, be drawn on all edges (mine is shown on one edge only) and in whatever units you feel most comfortable with.
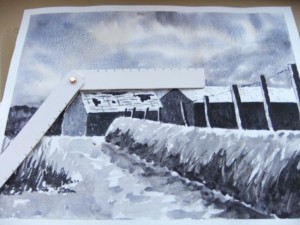 You use the protractor by setting it against and angle on a reference picture that you wish to use. Once the angle has been set then you can carefully transfer the protractor to your painting surface and draw the required lines. You could, if you wanted to, increase or decrease the scale when you transfer the lines by, for example, measuring the side of the roof in my painting as 3cm and then drawing it as 6cm on the target drawing. I believe that if this method is used for a short while then the artist will soon start to feel confident enough to use their judgment as to the angles required and produce them without the use of the tool. This would be a good example of why the use of tools, techniques (and downright cheats as some artistic sticklers might have it) can be useful in the development of artists. Lets face it……. we’re not in this to pass exams or to sell our work for £1000’s……..rather, we’d just like to get better so that we start impress ourselves.
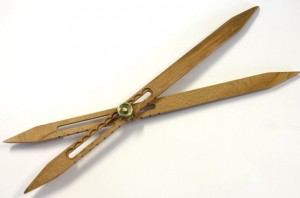
This is a simple tool that is essentially two flat sicks, with a point on each end, that are connected in the middle so that the pivot point may be moved. It is clear from the picture on the right that if the pivot were moved along the tool then the relative openings at each end will change. At the moment we can observe that the right hand end is approx twice as wide as the left. If the pivot were moved nearer the left hand end then that ratio might get as great as 1:4. 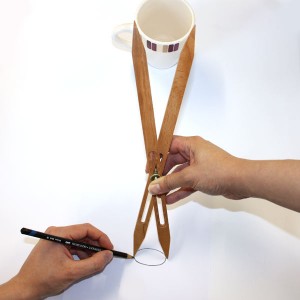 This tool can be used therefore to measure a reference image with (for example) the right hand end and then use the left hand end to create the corresponding mark on the painting surface. In this way your ultimate drawing would be smaller than the source image. Of course this could be used be used in the opposite way ie to magnify an image onto your drawing. This particular item (and images) are taken from Ken Bromleys site, and at the time of writing (February 2012) cost £5.95. They have a range of scaling from 1:4 to 4:1 They are available from lots of other places, not least the SAA (the Society for all Artists) to name but one.
Other Drawing Tools
There are lots of tools, aids and equipment to assist in the production of drawings. For the sake of completeness (or a least a certain comprehensiveness) I will mention some below. The descriptions will be basic and the internet will be full of equipment to buy, images to look at or fuller instructions for use.
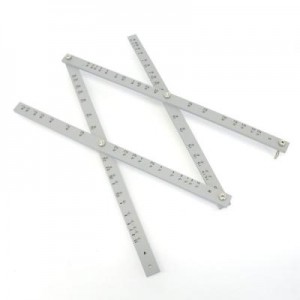
This is a mechanical aid that is essentially four strips of metal, wood or plastic; that is linked together to create enlarged, reduced or size for size copies of a reference drawing to an intended drawing surface. The one shown here is available from Ken Bromley (with thanks to them for the image which is also theirs) At the time of writing (February 2012) a pantograph costs approx £15. These will be available from lots of suppliers…… search the internet.
Camera Lucida
A camera lucida works by giving the illusion that the 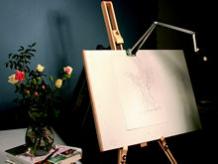 subject article or drawing has been projected onto the drawing surface. This is achieved by a clever prism that allows both subject and drawing surface to be viewed at the same time. This then allows the artist to trace the items projection on the drawing surface. The Society of All Artists (SAA) currently sell these at approx £48 for members. The image shown here is from their site and they own the copyright. Clicking here will take you to the correct page.
Templates
These will likely be circle and ellipse 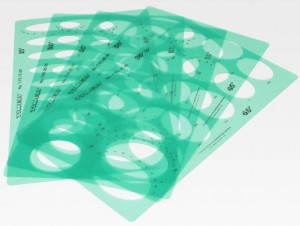 templates but there will be others more varied than I could describe representing all subjects. The 13th Century artist Giotto is said to have been asked to draw something to show his skill to the Pope whereupon he painted a perfectly round circle freehand on a piece of paper and sent that. For those of us without Giotto’s skills there are templates.
Erasing Shield
These are usually made from thin rust proof metal……. sometimes brass but more often 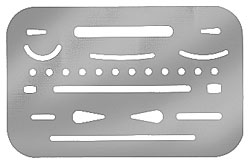 steel. I have seen them in plastic but they all work the same way in that the shield has a selection of shapes eg slits, circles, slots etc that can be placed over a drawn feature so that only that line is accessible to an eraser. They can be quite useful where lines are close together and attempting to rub one out can often mean “collateral damage” to the surrounding area. They are generally just pence to buy….probably about £1
I used to be a draftsman way back in the last century and these were in evidence in my office. Of course I have never used one as I have never made a mistake…… honest.
To be continued………
